Using Cura Slicer often feels like the moment where ideas begin to take shape. When someone opens the software for the first time the screen can feel a little mysterious but also inviting. Cura has a way of making you feel comfortable even if you are not an expert because the interface is clean and the workflow is simple to follow. At the same time it leaves enough room for deeper adjustments so you can grow with the software as your experience increases.
This guide explains Cura in a human way by focusing on the real experience of slicing a model. Instead of listing technical definitions it helps you understand why each action matters. From preparing the workspace to choosing print profiles this article walks you through the journey of turning a digital file into something you can touch.
Steps To Use Cura Slicer Effectively:
Cura Slicer is more than a tool for preparing a model. It becomes the place where creativity and precision meet.
In this section we explore what it feels like to work with Cura thoughtfully by learning to observe the workspace, preview the layers and understand the deeper purpose behind every adjustment.
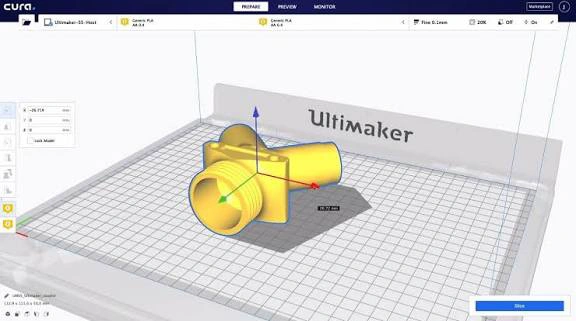
1. Preparing The Workspace:
Preparing the workspace is the moment where everything begins. Cura encourages you to slow down and understand the environment you are working with before slicing anything.
- Select your printer from the device list so Cura loads accurate dimensions.
- Choose your material to match the temperature settings.
- Place a simple model on the bed to see how Cura auto aligns it.
- Use rotation and movement tools to adjust the orientation.
- Review the layer preview to confirm the first layer foundation.
- Save your workspace layout for future UAE
The grid represents your actual print bed and this helps you visualise how your object will sit. This stage is about familiarity and comfort rather than complexity. Once you feel comfortable here the rest of the steps feel natural.
2. Importing And Positioning The Model:
Importing a model is the moment your idea appears on the virtual bed. This is usually where excitement enters the process. Positioning matters because the stability and surface finish depend heavily on how the model sits. Cura gives you a comfortable set of controls to move, rotate and scale the model so you can find the most secure orientation.
- Click the open file option and select your STL file.
- Move the object freely on the bed to test different placements.
- Rotate it along each axis to find a supportive base.
- Scale the model if you need a different size.
- Duplicate the object when printing multiple copies.
- Snap the model to the build plate for perfect grounding.
3. Choosing A Print Profile:
Print profiles in Cura control how fine, detailed or strong your final print will be.
- Select draft, standard or fine based on the level of detail required.
- Adjust layer height to change smoothness.
- Change wall thickness for increased strength.
- Review print speed to find a balance between detail and time.

- Change infill density for lighter or heavier parts.
- Enable cooling options for sharper edges.
Profiles make Cura feel friendly because they offer ready made settings while still allowing you to customize. Choosing a profile gives you a chance to shape the personality of the final print whether you want speed or beauty
4. Adjusting Infill Patterns:
Infill determines how strong and stable your printed object will be. Even though it is hidden inside the model it has a significant impact on durability and weight.
Cura offers a variety of infill patterns and each one behaves differently under force. Understanding these differences helps you make objects that feel purposeful in your hands.
- Select a pattern such as grid, gyroid or tri hexagon.
- Use higher density for mechanical or load bearing parts.
- Reduce density for light decorative models.
- Adjust infill line width for precision control.
- Review the preview to confirm the internal structure.
- Combine patterns when you want specialised performance.
5. Setting Temperatures And Speeds:
Temperature and speed affect how the filament flows from the nozzle and settles on the bed. Select the recommended heat range for the filament.
- Increase temperature for stronger bonding.
- Lower temperature for cleaner corners. Reduce speed when printing tiny details.
- Increase speed for faster but less refined prints. Enable controlled cooling for complicated shapes.
Cura connects these values to your selected material so you always have a safe starting point. Tuning them gives you control over sharpness, bonding and surface feel. This step becomes easier once you start noticing how your printer responds to small changes.
6. Adding Supports When Required:
Supports play an important role when your model includes overhangs or areas that cannot hold themselves during printing. Cura generates support automatically but still lets you decide how strong or sparse they should be. Good support structures save a print from sagging and improve the outer surface quality.
Enable support generation whenever the model contains steep overhangs. Choose between supports touching the build plate or supports placed everywhere. Reduce density for easier removal. Use tree supports for natural curved shapes.
Tips To Use Cura Slicer Effectively:
One of the most comforting parts of Cura is that improvement happens naturally as you explore. Small adjustments create visible differences and you slowly develop a sense of how to reach the quality you want. These tips help you navigate Cura with more confidence.
First understand that Cura rewards patience. Take your time with orientation and preview because many issues are solved before the print even starts. Do not ignore the first layer since it decides whether the rest of the print survives. Always experiment with small models before applying big changes.
Below are additional helpful points:
- Keep your build plate clean for stronger adhesion.
- Lower your initial layer speed for smooth foundations.
- Use preview mode before every print to detect weak areas.
- Test new materials by printing calibration models.
- Save custom profiles when you find settings that consistently work.
- Adjust retraction settings when dealing with stringing.
Future Of Cura Slicer:
The future of Cura Slicer looks promising because it continuously evolves with the printing community. New features are added regularly to improve usability, speed and accuracy. Developers focus on smarter profiles, cleaner supports, better material compatibility and enhanced preview visualisation.
As printers become faster Cura is expected to offer quicker slicing and adaptive settings that respond automatically to model shape. There is also a growing trend of cloud based slicing which may allow users to prepare prints from any device. Cura is steadily moving toward a more intuitive and intelligent experience where fine adjustments feel natural and results become more predictable even for beginners.
Conclusion:
Cura Slicer becomes easier when you treat it like a partner that helps shape your ideas. Every setting connects to a real physical outcome which makes learning feel rewarding. Once you understand the workspace, profiles, infill, speed and supports you begin to notice how Cura gives you control over every layer. The more time you spend with it the more confident you become. Cura is not about rushing through settings. It is about watching your imagination slowly become something you can hold.
FAQs:
Cura provides simple controls, helpful default profiles and a clear preview that guides beginners through each step without confusion.
Yes, Cura supports many printers and loads the correct machine settings once you choose your model from the list.
Infill defines the internal strength, weight and durability of the printed part and directly influences how the final object behaves.
Yes, orientation affects stability, surface finish and the amount of support needed, making it a key step before slicing.
Preview mode shows the exact path of every layer so you can detect errors early, saving time, material and failed prints.